Bad hides, bad nesting, and bad marking can quietly burn your profit. I see it every week, and it hurts more than a dull blade.
Vision + defect detection boosts yield by mapping hide contours and flaws, so the nesting engine places parts in clean zones and avoids waste.

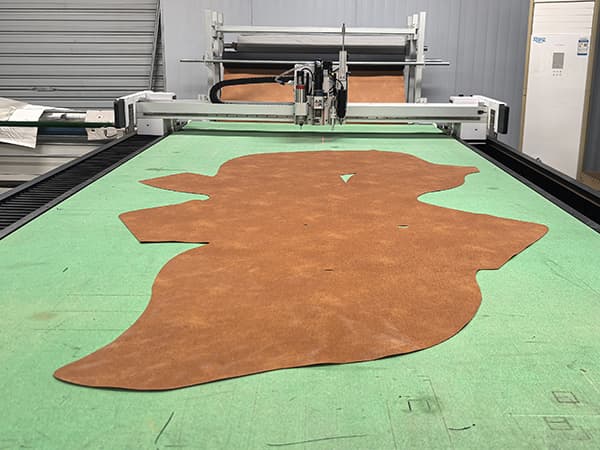
If you run a cnc leather cutting machine line, you already know leather is not a “flat sheet” material. Every hide has surprises. Some surprises are expensive. If you want higher yield, you need to see the hide clearly, mark defects consistently, and let software do the heavy nesting work. I will keep this practical, because nobody buys an automatic leather cutting machine to do more manual work. Now let me show you the exact steps.
Why does “defect detection” matter more than most buyers think?
Manual inspection misses defects, and missed defects become rejected parts. Then the “cheap hide” turns into a very expensive hide.
Defect detection matters because human inspection accuracy is limited, while camera + AI can register defects consistently and feed that map into nesting and cutting decisions.

What I call “real defects” on a cutting floor
I always separate defects into two groups:
- Visible defects: scars, holes, color issues, surface damage. Operators can see these, but they still miss them when they rush.
- Hidden or easy-to-miss defects: subtle grain issues, small marks, or defects that show better on the flesh side.
A research paper on automated leather defect detection notes that traditional inspection relies on humans with accuracy around 70%–85%, which directly limits leather utilization and creates waste.
That range matches what I see in real factories: if the operator is tired, the defect map becomes “creative.”
How vision systems standardize the decision
When I set up a genuine leather cutting machine project, my goal is simple: make defect decisions repeatable.
A typical workflow captures the hide contour and registers quality zones and flaws, then uses that data for nesting and cutting.
That structure removes the “different operator, different result” problem.
What changes in your KPI after consistent defect mapping
When defect mapping is consistent:
- I see fewer re-cuts, because fewer bad parts slip through.
- I see fewer arguments between cutting and sewing.
- I see cleaner production reports, because scrap has a clear reason.
This is why I push vision and defect detection early in the buying discussion. If a customer only asks about cutting speed, I already know they will fight waste for the next two years.
How does hide recognition actually work on an automatic leather cutting machine?
If the system cannot “understand” the hide contour, the nesting software is guessing. Guessing is not a strategy.
Hide recognition works by using a camera system to capture the hide outline, then the software aligns the digital contour to the physical hide for accurate nesting and projection.
Capture: I start with lighting, not software
Many buyers think the camera is the key. I think the lighting and contrast are the key.
If your lighting is unstable, the hide edge looks “soft” to the camera. Then your contour becomes noisy. Then the nesting boundary becomes wrong. Then parts drift closer to defects. That chain is painful.
Research on automated defect detection also emphasizes controlled imaging conditions (like stable lighting) to reduce error and improve inspection quality.
Recognition: contour + zones, not just a photo
A serious system does not only take a picture. It builds a working map:
- Hide contour (usable boundary)
- Quality zones (premium areas for visible parts)
- Defect zones (avoid areas)
This is the structure described in a standard leather processing workflow: capture hide contour and register quality zones and flaws, then nest and cut.
Projection: why I like it for leather teams
Projection is not a “nice-to-have.” It is a training tool and a mistake killer.
When the layout is projected onto the hide, operators can quickly confirm orientation, part grouping, and whether high-visibility parts sit in clean zones.
In real life, projection reduces “operator doubt,” and it reduces wrong picking.
My short checklist before I trust hide recognition
Before I say the system is ready, I check:
- The contour line does not jump on hairy edges.
- Defect marks sit where the operator expects them.
- Projection matches the actual hide position without repeated re-alignment.
If those three points pass, the rest becomes simple. If they fail, no nesting algorithm can save you.
How does auto-nesting improve yield, and what numbers are realistic?
If your nesting is manual, you are paying skilled people to do a job that software can do faster and more consistently.
Auto-nesting improves yield by placing parts around defects and optimizing spacing and orientation, and case studies report measurable material savings and higher throughput.

Yield is not a feeling. It is math.
I define leather yield as:
Yield = Total part area ÷ Usable hide area
The key word is usable. Vision and defect detection increase the accuracy of “usable hide area,” and nesting increases the area you convert into sellable parts.
What the market shows about savings and throughput
A Lectra customer story reports that automatic nesting can increase material savings by 10% compared to manual nesting, and the same case mentions 25% more hides per hour after upgrading.
That is not a small improvement. That is the kind of improvement that changes how many cutters you need per shift.
Some solutions also claim fast nesting cycles and high utilization targets (for example, one AI nesting system claims utilization above 85% and small percentage improvements versus alternatives).
I treat vendor claims as directional, but I still use them to set expectations.
A simple comparison table I use with buyers
| Item | Manual Nesting | Vision + Auto-Nesting |
|---|---|---|
| Nesting time per hide | 5–15 min (depends on skill) | 1–5 min (depends on rules) |
| Defect avoidance | Inconsistent | Systematic map-based |
| Yield stability | Operator-dependent | More stable day-to-day |
| Re-cut risk | Higher | Lower |
I do not promise a fixed percent without testing your hides. I do promise this: software never gets tired, and it does not “forget” to avoid a defect zone.
How I tune nesting rules for genuine leather production
In AMOR CNC projects, I usually tune rules like:
- Keep grain direction for visible parts.
- Prioritize premium zone for “A surface” parts.
- Fill remaining space with hidden parts or reinforcements.
- Lock minimum spacing so the knife path stays stable.
This is where an AMOR CNC cnc leather cutting machine becomes a real production system, not just a cutting table.
What setup details decide success: camera, vacuum, and workflow discipline?
Good software cannot fix a bad process. Leather is flexible, so the process must be tight.
Success depends on reliable hold-down, repeatable capture, and a clean workflow where camera capture, nesting, projection, and cutting follow the same rules every time.

Vacuum hold-down: I treat it like “insurance”
Leather moves. If leather moves during cutting, your dimensions drift and your edges look ugly.
A leather workflow description notes that a powerful vacuum system provides reliable material hold-down during cutting.
In practice, I also recommend:
- Use zoning so you do not waste suction on empty areas.
- Use a spoil board that matches leather behavior (not too rough, not too slippery).
- Train operators to smooth hides before capture, not after.
Camera position and calibration: small errors become large waste
If the camera-to-table calibration is off, your defect map shifts. Then you cut “good parts” into “bad zones.” That is a fast way to lose trust in automation.
I always set a fixed daily check:
- Place a known calibration template.
- Capture and verify alignment in software.
- Confirm projection overlay.
This takes minutes. It can save hours.
Workflow discipline: capture → nest → cut, no shortcuts
AMOR CNC leather workflow is a clean model: capture hide contour and flaws, nest parts for best yield, then proceed to cutting, and use projection for picking/sorting.
I like this sequence because it removes chaos.
When operators skip steps, the system becomes useless. When operators follow steps, the system becomes addictive.
My personal “small story” from a leather shop
I once watched a team blame the cutter for low yield. The real problem was simple: an operator rotated hides after capture, because “it looks straighter.” The software map was correct, but the hide moved. The nesting was perfect, but it was perfect on the wrong hide position. After we locked the workflow and used projection checks, their scrap dropped fast.
Yes, the machine
How Do I Justify ROI for a CNC Leather Cutting Machine With Vision and Nesting?
If I cannot explain ROI in one page, procurement will slow the project down. I keep the math simple, and I only use numbers that a buyer can verify on the shop floor.
ROI mainly comes from three things: material savings, higher throughput, and fewer re-cuts. Vision (hide recognition + defect mapping) protects quality zones, and nesting converts more of the usable hide into sellable parts. That combination is where the money shows up.
The Three ROI Levers I Always Calculate
I always calculate these three levers first, because they apply to almost every leather factory:
- Material savings (yield improvement)
Leather is expensive. Even small yield gains create big monthly savings. - Labor savings (less manual nesting + less rework)
Auto-nesting reduces the time skilled operators spend arranging parts, and defect mapping reduces time wasted on re-cuts. - Throughput gains (more hides per hour)
Faster nesting and fewer interruptions mean more hides processed per shift.
I have seen published customer cases reporting measurable material savings and productivity improvement after moving from manual workflows to automated scanning and nesting, including a reported 25% increase in hides per hour in one customer story. That kind of gain is not universal, but it is a useful benchmark to show procurement that the impact can be real.
A Clean ROI Table Procurement Actually Accepts
I ask buyers to provide only a few inputs. These are numbers they already track, or they can measure in one week.
| Input | What I ask you to provide | Why it matters |
|---|---|---|
| Monthly leather spend | Total leather cost per month | Savings scale with spend |
| Current scrap / reject rate | % of hides or parts rejected | Baseline for improvement |
| Nesting time | Minutes per hide (manual today) | Shows labor + bottleneck impact |
| Re-cut rate | % of parts re-cut (defect-related) | Shows value of defect mapping |
| Production target | Hides/day or parts/day | Converts time gains into output |
When I have these five numbers, I can produce a simple payback view that a purchasing manager can understand in two minutes.
A Simple ROI Example (No Fancy Math)
Here is the structure I use. You can plug in your real numbers.
- Monthly leather spend: $80,000
- Expected yield improvement from vision + nesting: 5%
- Material savings: $80,000 × 5% = $4,000/month
Now add time:
- Manual nesting time: 10 minutes per hide
- With auto-nesting: 3 minutes per hide
- If you process 60 hides/day, you save 7 minutes × 60 = 420 minutes/day = 7 hours/day
That time saving shows up in one of two ways:
- You run more hides per shift, or
- You keep output the same but reduce overtime and stress.
Then add quality:
- If defect mapping reduces re-cuts by even 1–2%, it saves leather, time, and delivery risk at the same time.
This is why I do not sell ROI as “one number.” I sell ROI as a combination of three small wins that stack.
What “Realistic Improvement” Looks Like
I do not sell dreams. I sell controlled improvement.
- Some factories gain small but steady savings because they already have strong manual nesting.
- Some factories gain fast and obvious savings because their current process depends on one “nesting expert,” and results change by shift.
- Factories with high defect rates often gain more from defect mapping than from nesting speed alone.
I always explain this clearly: your result depends on hide quality, product rules (grain direction, part priority), and how strictly your team follows the workflow. When the workflow is stable, results become stable.
How AMOR CNC Positions This for Genuine Leather Production
When buyers ask me what makes AMOR CNC different, I do not start with a long spec sheet. I focus on production stability:
- I focus on workflow stability, not only cutting speed.
- I focus on repeatable defect rules and consistent quality zones.
- I focus on making operators trust the process, because trust removes shortcuts and protects yield.
A genuine leather cutting machine should reduce chaos, not create a new daily argument between cutting and stitching. When vision and nesting are set up correctly, the system becomes predictable. Predictability is what procurement wants, and it is what finance pays for.
Conclusion
I justify ROI by stacking material savings, throughput gains, and fewer re-cuts into a clear monthly payback story that procurement can verify.