跳到内容
跳到内容 
Bad folds waste more cartons than bad cuts.
Choose a creasing wheel for thin board and a V-cut tool for thick board (>5mm). Both create fold lines, but they work differently and affect fold strength, corner accuracy, and assembly speed
I will say this upfront: I never treat a V-cut tool and a creasing wheel as enemies. I treat them as two “folding methods” for two different board behaviors. If you only want a quick rule, you can stop after the next section. If you want clean folds, faster assembly, and fewer rejected boxes, you should keep reading.
Why do folds fail even when the cut looks perfect?
A perfect outline can still become a terrible box.
Folds fail because the board structure reacts differently to pressure and material removal. Creasing presses fibers and flutes; V-cut removes material to control the bend. The correct choice depends on thickness, flute structure, and the fold quality you need.
I start with “what the fold must do”
I always ask one simple question before tooling selection: What must the fold do after bending?
A shipping box needs strong corners. A gift box needs sharp edges. A display carton needs clean lines and fast assembly.
A fold line can fail in three common ways:
- Cracking: the top liner tears at the bend.
- Spring-back: the board refuses to stay at the angle.
- Bulging corners: the corner becomes round and loose.
I see these failures even when the cut edge looks clean. The reason is simple: cutting defines shape, but folding defines performance.
Creasing vs V-cut is a physics choice
A creasing wheel compresses the board. It pushes fibers down and creates a controlled hinge line.
A V-cut tool removes material. It creates a gap so the board can bend without fighting its own thickness.
This is why thickness matters. When the board is thin, compression is enough. When the board becomes thick, compression becomes a fight.
A quick comparison table for rational buyers
| Item | Creasing Wheel | V-Cut Tool |
|---|---|---|
| How it works | Presses and compresses | Removes material (creates a groove) |
| Best for | Thin board / standard corrugated | Thick board (>5mm) / rigid board |
| Fold look | Natural radius, good strength | Sharp fold, controlled angle |
| Risk if misused | Weak fold line or cracking | Over-cut, weak hinge, visible gap |
| Assembly impact | Smooth, fast for regular boxes | Fast for rigid boxes and sharp edges |
What is the simplest decision rule by thickness?
Guessing thickness rules creates expensive scrap.
Use a creasing wheel for thin board and use a V-cut tool for thick board (>5mm). This rule works because thin board responds well to compression, while thick board needs material removal to fold cleanly.
My “two-step thickness” rule
I keep a simple rule that operators can follow without debate:
- ≤ 5mm board thickness: I start with a creasing wheel.
- > 5mm board thickness: I start with a V-cut tool.
I do not treat this as a law of nature. I treat it as a fast filter that works in most workshops.
Why the “>5mm” line is practical
When thickness increases, the bending resistance grows fast. Operators then apply more pressure and run more trials. That costs time.
A V-cut tool changes the game because the fold line becomes “guided.” The board bends where the groove is, and the corner becomes cleaner with less force.
Here is a simple visual you can show to your team:
Bending resistance vs thickness (concept)
- 2mm board: ███
- 5mm board: ███████
- 8mm board: ████████████
This is why thick board usually needs a V-cut groove. The tool removes the material that causes resistance.
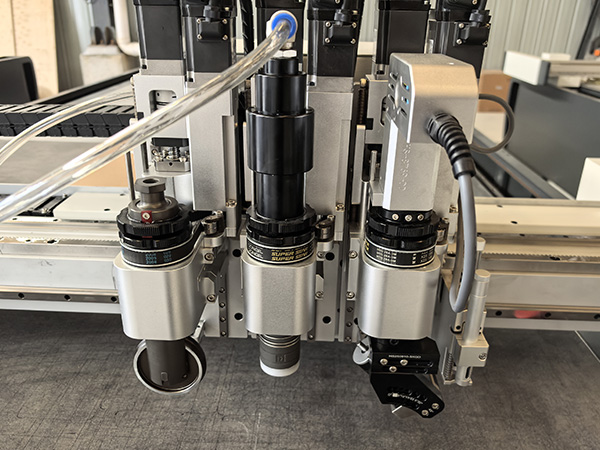
Practical notes about V-cut geometry
In many carton workflows, the V-cut tool angle can be adjustable (often within a practical range like 0–45° at the tool head). The groove shape controls how sharp the fold looks and how the edges meet.
I always tell customers this:
- A deeper or wider groove can create a sharper fold.
- Too much removal can create a weak hinge.
- Too little removal can cause spring-back.
So the correct setting is not “maximum.” The correct setting is “enough to fold cleanly.”
How does tooling choice change fold quality and corner strength?
A slow assembly line often starts with bad folds.
Creasing keeps more material in the fold, so corner strength stays high. V-cut creates a sharper fold and faster alignment for rigid boards, but it can reduce strength if the groove removes too much material.
I measure fold quality with three simple checks
When I run sample tests, I use three checks that any factory can copy:
- Crack check: I bend once to 90° and inspect the liner.
- Angle hold check: I release pressure and watch spring-back.
- Corner squareness check: I assemble a corner and measure the gap.
If I see cracks on thin board, I adjust crease depth and wheel pressure.
If I see spring-back on thick board, I switch to V-cut or deepen the groove slightly.
Why creasing often gives stronger corners
Creasing compresses the structure but keeps most fibers intact. That usually gives better corner strength for shipping cartons.
I use creasing when:
- the box is load-bearing,
- the customer cares about stacking strength,
- and the board thickness is moderate.
Creasing also avoids the “visible groove line” that some premium packaging does not want.
Why V-cut often gives faster alignment for rigid boxes
V-cut makes bending feel “automatic.” Operators can fold with less force, and edges meet more cleanly. This often improves assembly speed for rigid or thick board jobs.
Here is a simple assembly-speed logic chart:
Assembly speed impact (typical)
- Thin board + creasing wheel: ✅ fast
- Thick board + creasing wheel: ❌ slow (more force, more retries)
- Thick board + V-cut: ✅ fast
I have seen teams reduce folding struggle immediately just by using the right tool for thick board. The workers stop fighting the material.
How do I set up a reliable workflow on a CNC oscillating knife cutting table?
Tool conflict creates chaos. Tool sequence creates stability.
Run creasing or V-cut first, then run the oscillating knife for cutting. This sequence protects edges, keeps the sheet stable, and reduces tearing at corners.
My default sequence and why it works
I keep the workflow consistent across plants:
- Crease / V-cut first
- Cut second
- Unload and assemble
This sequence matters because creasing and V-cut apply force. If the outline is already cut, small parts can shift, and corners can tear.
The “file layer” method prevents operator mistakes
I recommend a simple file rule:
- One layer/color for cut
- One layer/color for crease
- One layer/color for V-cut (if used)
This prevents a classic mistake: operators forget to change tools, or they run cutting on crease paths.
A practical setup checklist I use on-site
I use this checklist when I train operators. Each item is fast, but it prevents big problems:
- I confirm board thickness with a caliper.
- I confirm flute direction for critical folds.
- I choose creasing wheel or V-cut based on thickness.
- I run one sample corner first, not a full sheet.
- I adjust depth/pressure once, then I lock the setting.
A lot of “tool debates” disappear when the workflow is stable.
What mistakes make buyers think the tool is “bad”?
Many buyers blame the tool. The setup is often guilty.
Creasing fails when pressure is wrong or flute direction is ignored. V-cut fails when groove depth is excessive or the wrong angle is used. The correct tool still needs correct parameters.
Mistake 1: Using a creasing wheel on thick board to “save time”
Some teams try to crease thick board because it feels simpler. Then the fold becomes inconsistent, and assembly becomes slow.
I see two outcomes:
- Operators push harder and crack liners.
- Operators accept spring-back and use tape, which increases labor.
If thickness is >5mm, the creasing wheel can still work in some cases, but the process window becomes narrow. That is why V-cut is usually the safer choice.
Mistake 2: Overcutting with V-cut and destroying hinge strength
A V-groove should guide bending, not delete the fold.
When the groove is too deep:
- the fold line becomes weak,
- corners can split during handling,
- and the groove line can look ugly on premium packaging.
I always tell customers to treat V-cut depth like seasoning. A little is helpful. Too much ruins the dish.
Mistake 3: Ignoring the business goal of the box
A shipping box and a premium gift box do not share the same fold KPI.
I match tooling to goal:
- If the goal is strength, I lean toward creasing where possible.
- If the goal is sharp edges and clean alignment on thick board, I lean toward V-cut.
- If the goal is speed with many SKUs, I choose the tool that gives the widest stable parameter range.
Here is a simple “goal-based” comparison:
| Business Goal | Better Starting Tool | Why |
|---|---|---|
| Strong shipping corners | Creasing wheel | Keeps more structure |
| Premium sharp fold (thick board) | V-cut tool | Controlled bend angle |
| Many SKUs, fast changeover | Depends on thickness | Stable setup wins |
Conclusion
V-cut and creasing are partners. I match them to thickness and box goals to get clean folds, strong corners, and fast assembly.