My foam inserts look “fine” until customers complain. I have seen this too often, and it costs real money.
A buyer should check five things: material range, tooling, vacuum hold-down, workflow software, and support that reduces scrap and training time.

If you only want a cheap quote, you should stop reading now. I will focus on the questions that protect your edge quality, yield, and delivery dates—so you do not buy the wrong machine.
1) What materials and thickness do I need to cut today—and in 12 months?
Many buyers say “foam,” then they discover it is five foams. The wrong setup creates tearing, rough edges, and wasted sheets.
Define your real material list, thickness range, and hardness now. I always match tool force, blade geometry, and table hold-down to that list.

The material list is your real specification
I always start with one simple rule: material behavior decides the tool, not the brochure. EVA and EPE can look similar, but they do not cut the same. EVA has more “snap back,” and high-density EVA increases cutting resistance. EPE can stretch and deform if downforce and blade choice are wrong. PU foam can crumble if the blade is dull or the speed is too aggressive.
I ask buyers to write a list like this: material name + thickness + sheet or roll + target edge quality. I also ask them to add one future line: “what we may cut next year.” Many packaging factories expand from EPE to EVA, then add honeycomb or corrugated as a “side business.” That single change can justify a different tool holder or a stronger vacuum system.
I also use simple production numbers. If your insert is a high-mix job, you will change files often. If your insert is a repeat job, you will run long cycles. These two modes need different priorities. High-mix needs fast setup and stable hold-down. Repeat jobs need higher speed and lower blade cost.
Here is a simple reference I use in discussions:
| Material | Common thickness | Typical risk | What I check first |
|---|---|---|---|
| EPE foam | 10–80 mm | stretching, edge pull | vacuum + tool downforce |
| EVA foam | 5–60 mm | rough edge on hard EVA | oscillation power + blade |
| PU foam | 10–60 mm | crumbling, dust | blade sharpness + feed speed |
| Honeycomb board | 10–40 mm | crushed cells | tool type + pressure setting |
2) Which tool configuration fits my insert design—not just my material?
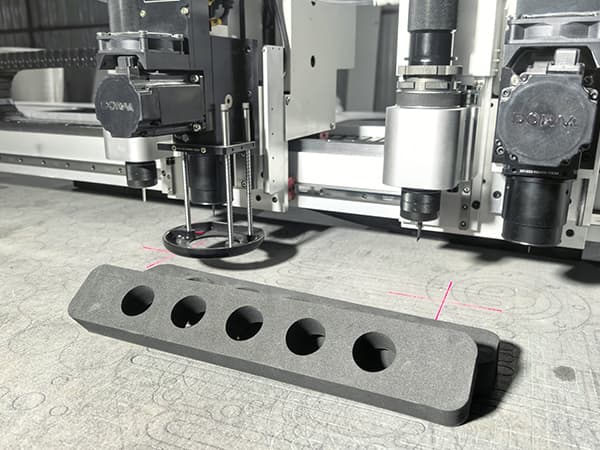
Many machines “can cut foam,” but your insert is not a rectangle. Pockets, steps, and tight corners expose weak tooling fast.
Choose tools based on the insert structure: contour cut, pocket milling, kiss-cut, and marking. One head rarely solves everything well.

Tooling decides your edge quality and cycle time
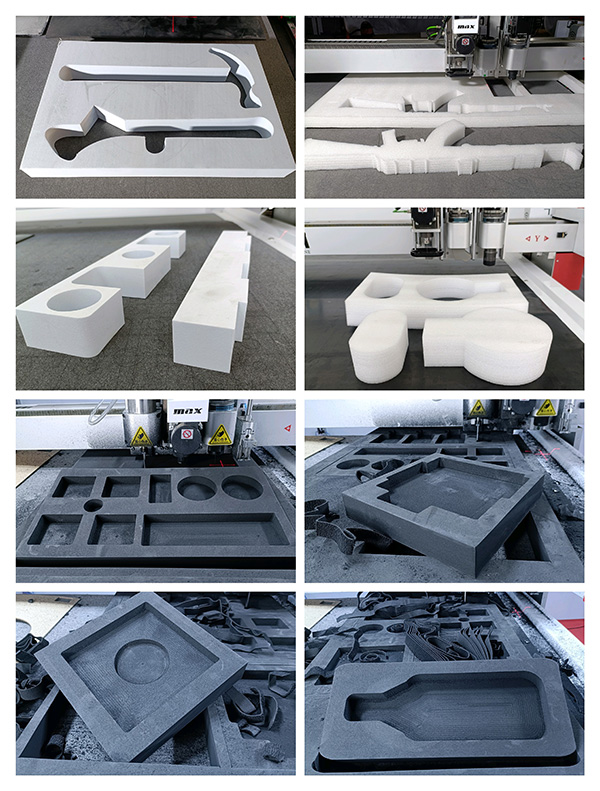
I separate insert work into four actions: cut, pocket, mark, and separate. A clean contour cut is only the start. Many inserts need pockets for products, cable grooves, or multi-depth steps. If you try to “force” everything with one oscillating tool, your cycle time increases and your edges get worse.
I often recommend a two-tool setup for packaging inserts: an oscillating tool for contours and a milling cutter for pockets. This combination prevents a common issue: buyers try to use a knife for deep pockets, then the foam stretches, and the pocket walls look fuzzy. A milling cutter produces cleaner pocket walls and better depth control for stepped inserts.
I also talk about basic performance ranges, because buyers ask. In many factories, a stable oscillating knife cutting speed for foam contours is often 200–600 mm/s, depending on thickness and hardness. Pocket milling is slower, and that is normal. If you need high throughput, I plan the workflow so the knife finishes contours fast while the milling tool only does pocket areas that truly need it.
This quick comparison helps buyers decide:
| Process need | Best tool | Why it matters |
|---|---|---|
| Fast contour cutting | Electric or pneumatic oscillating tool | cleaner edge, stable penetration |
| Deep pockets / steps | Milling cutter | sharp pocket walls, better depth |
| Perforation / easy tear | Kiss-cut / creasing tool | controlled depth, easy separation |
| Part ID / assembly marks | Marking pen tool | fewer packing errors |
I remember one client who insisted they “only cut foam.” Two weeks after installation, they asked me how to make clean cable grooves. The answer was simple: they needed the right pocket tool from day one. I always tell buyers to plan for what the insert must do, not only what it is made of.
3) How will I hold the material down so it does not move during cutting?
Foam looks soft, but it can slide like soap when the blade pushes it. One small shift can ruin an entire nested sheet.
I check vacuum power, zoning, and table sealing. A stable hold-down system reduces scrap more than any “high speed” claim.

Hold-down is the hidden cost driver
I treat hold-down as the “quiet hero” of insert production. When foam moves, you see problems that look like software issues: open corners, size drift, and mismatched pockets. In reality, the material is shifting.
I prefer zoned vacuum tables, because inserts vary in sheet size. If you run a small sheet on a full open vacuum surface, you waste suction and stability drops. With zones, you activate only the area under the sheet. In many real packaging jobs, a 7.5 kW vacuum pump with 6–8 zones is a strong baseline for 1600×2500 mm class tables. If your foam is very porous or very thick, you may need stronger vacuum flow or auxiliary sealing methods.
Porous foam creates another issue: vacuum leaks through the material. If air passes through the foam, the pump works harder but the hold-down may still feel weak. In those cases, I often use simple methods that buyers understand fast: use a sacrificial underlay, add edge sealing, or choose a table surface that reduces leakage. These are small details, but they protect sheet utilization.
I also check the “real” failure points:
- I check if operators open all zones “to save time.” That reduces hold-down.
- I check if the table surface is damaged or dirty. That causes leaks.
- I check if the cutting path starts with aggressive short segments. That can pull foam before vacuum stabilizes.
When buyers ask me for “accuracy,” I tell them this: accuracy is not only the servo motor. If the material moves by 1 mm, your accuracy is gone, no matter how good the machine is.
4) Can my workflow go from idea to finished inserts without wasting operator time?
A machine can cut well, but your team still loses hours on DXF cleanup, nesting, and file mistakes. That is where delivery dates die.
I evaluate software steps: import, nesting, toolpath, and labeling. I also test how fast a new operator can run a stable job.
Software is not “extra”—it is your daily production system
I use a simple test: I ask, “How many clicks does it take to go from DXF to cutting?” If the workflow is messy, production becomes slow and stressful. Packaging is high-mix by nature. Your team will handle many SKUs, many small changes, and many rush orders. If the software is hard, you will not use the machine’s full capacity.
I focus on four software points:
1) Nesting efficiency and real yield
Nesting is not only “fit more parts.” Nesting also controls cut order and keeps small parts from lifting. If your nesting improves material utilization by even 3–8%, that is real money in foam sheets. I have seen factories pay for software value faster than they expect.
2) Toolpath logic that protects foam
I want inside cuts first, then outside contour, and I want stable lead-ins. Foam does not like harsh direction changes at high speed. Good toolpath reduces edge pull.
3) Labeling and part IDs
Insert production fails when packing fails. If the software supports simple marking, you reduce picking mistakes and returns.
4) Operator learning speed
I once trained a client too fast and overwhelmed them. I changed my method: I start with one simple insert, then add complexity step by step. Buyers should ask suppliers for the same approach. A good system should let a new operator produce a correct insert quickly, not in three weeks.
If you sell inserts to premium brands, your workflow is your reputation. Cutting is only one part. The daily process must be smooth.
5) What service and training will keep my production stable after installation?
A CNC foam cutting machine is not a one-time purchase. Packaging customers call you when they have a rush order, not when you are “ready.”
I check the supplier’s training method, spare parts plan, and response process. Good support protects uptime and reduces blade waste.

Support quality decides your long-term cost
I judge support the same way buyers judge cutting: by results. I look for a clear plan that covers installation, training, and long-term maintenance.
Training should match real packaging work
I do not like “generic training.” Operators need the exact steps they repeat daily: load material, activate zones, run a test cut, confirm depth, and manage blades. A good supplier provides short training modules and clear troubleshooting steps. If training is organized, your team stays confident.
Spare parts should be simple and local-friendly
A packaging factory cannot wait weeks for a basic sensor or switch. I prefer systems that use standard industrial electrical components where possible, and I always recommend keeping a small kit: common blades, underlay material, and a few wear parts. This reduces downtime.
Blade cost control should be part of the plan
Blades look cheap, but waste is expensive. Many bad cuts come from dull blades or wrong blade angle. I often recommend keeping a simple blade rule: replace blades on a schedule based on cutting meters or shift time, not only when the edge looks “bad.” That keeps quality stable.
Remote support should be practical
I like support that uses video calls, clear screenshots, and recorded steps. When a supplier can diagnose quickly, your machine becomes a production tool, not a “project.”
I once supported a client during a holiday rush. Their foam started shifting, and they thought the machine had a fault. The real issue was a vacuum zone setting plus a worn underlay. We fixed it in minutes. The lesson was simple: support that understands real production saves orders.
Conclusion
I always buy for stability first, because stable cutting protects margin, delivery, and repeat business.